


My daughter’s Kindergarten teacher asked if anyone would like to make home made play dough for the class. It sounded like fun, so of course, I volunteered!
It was very quick and easy to make and not too messy after all. Here’s the recipe from my daughter’s teacher…
Play Dough Recipe
1 cup All-purpose Flour
1 cup Water
1/2 cup Salt
1 teaspoon Vegetable Oil
1/2 teaspoon Cream of Tarter
Food Coloring1) Mix the flour, water, salt, oil, and cream of tarter in a saucepan.
2) Cook over medium heat until the mixture holds together (keep mixing or it will stick to the bottom of the pan).
3) When the play dough is cool enough to touch, knead it on a lightly floured surface and add the food coloring. Continue kneading until all of the color is mixed in.
4) Place the playdough in an air tight plastic container and store it at room temperature.
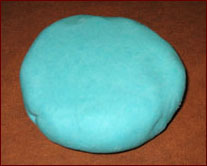
We used Neon Blue and regular Blue Food Coloring and got the nice medium blue color play dough that you can see in the photo above. That’s even after my daughter kept adding the Neon Blue (so it’s good to know that a lot of Neon Blue doesn’t make it too dark. As a matter of fact, we had to add the regular Blue Coloring to make it dark at all.)
If anyone knows a Play-Dough Recipe with metric measurements, or would like to share their experience with using other recipes or with making other colors, feel free to post it in the comments below.
Have fun making your play dough!
Lisa
This article was posted on Friday, October 6th, 2006 at 11:31 am and is filed under Crafts, Mama Lisa, Play Dough Recipe. You can follow any responses to this entry through the RSS 2.0 feed. You can skip to the end and leave a response. Pinging is currently not allowed.


October 7th, 2006 at 4:09 am
We usually make “pâte à sel” (= salt dough) and as it’s a non cooking recipe, it’s aimed for children. So we make it by volume too, not metric. It’s the same proportions though we don’t use cream of tarter and we don’t cook it either. Some people use glycerine instead of oil.
October 20th, 2006 at 8:37 pm
I have a neat book called: Recipes for Art and Craft Materials by Helen Roney Sattler that is full of homemade doughs, glues, paint, slime, and more.
My son and I like to experiment with homemade stuff to make and play with.
I like your site!
October 23rd, 2006 at 2:08 am
I use Metric recipes, this site repeats that recipe and has some lovley scented and edible doughs. I recommend the Simple Play Dough receipe from this site.
I made a 3 x this recipe in January this year (it gets used once a week by 10+ children) and it’s still not sticky, very useable and is easy to vacuum off carpet when it dries.
A good investment of time and effort.
August 1st, 2007 at 12:32 am
I Kinda like this recipe.But izcoo!!
August 1st, 2007 at 12:33 am
And the playdough is squishy!!
October 8th, 2007 at 4:57 pm
It is important to remember that if playdough is made for the classroom that it should only be used for 1or2 weeks then thrown out because itis a germ magnet. I collect playdough recipes and would like you to send any unique ones you might have to add to my collection. For school I prefere the kool aide play dough and do other holiday scents.
July 3rd, 2008 at 12:11 pm
I would like to contact sherri about her recipe collection of play dough I also collect them and I teach. Please forward my e-mail address to her.
Thank you,
Sherri Maynard
August 7th, 2008 at 12:07 pm
Can you cook playdough in the oven after modelling, so kids can take it home?
August 8th, 2008 at 10:46 am
We’ve made ornaments with just the flour, water and salt and cooked at a low temperature for a long time.
Use 2 parts flour to 1 part water to 1 part salt.
Here’s one recipe:
2 cups flour
1 cup salt
1 cup water
Mix the flour and salt together first. Then slowly add the water so you get a smooth dough. Roll out with a rolling pin (or better yet, let the kids roll it out) to 1/4″.
Bake at 250 F for 1 to 2 hours. Keep checking that they’re dried out but not brown. Once they look dried out and feel hard – they should be done.
You can either add food coloring to the dough in advance for color and then shellac them or leave the dough plain and paint them afterwards.
If you’re making an ornament to hang – be sure to make a whole with a toothpick before baking – so you can hang them on a string or ribbon afterwards.
One fun project that I did with my son when he was little was to roll the dough into an oval shape. Then he pressed his hand-print into the dough. After it cooked he painted it with gold paint and glitter glue. We made a few of them and gave them out to the grandparents for the holidays. Make sure to keep one for yourself!
September 23rd, 2009 at 7:41 am
Thank you for this recipe!