


During most of the centuries that people have colored eggs for Easter, the dyes used were made from natural products like onion peels, bark, beets and blueberries. Of course, it’s different today.
These days, most of us use store bought tablets that make dyeing Easter eggs quick and easy. My children and I have enjoyed doing it that way for years. And you can’t complain about the price – it usually costs less than two dollars to buy a packet of dyes.
On the other hand, I love to try to do things the way they were done in the old days. (As long as the task doesn’t involve ironing or starching shirts!) When my colleague from France mentioned that she used to dye eggs naturally, I knew that one day I had to try it.
I’ve been eggs-perimenting for the past week. Below you’ll find my results – both the ones that worked and those that didn’t. Hopefully, if you try it, you’ll learn from my mistakes and won’t have to waste your time on the failures.
Below, I’ve given general instructions, followed by specific instructions to make dyes of various colors.
By the way – One important goal I set for myself was to make sure that the final results, the dyed eggs, were completely edible. So if you use the ingredients listed below, feel free to make a nice egg salad for your family when you’re done! (As you’d imagine, it turned out that the eggs that cooked separate from the dye ingredients tasted better. The ones that cooked with the ingredients had a bit of a rubbery taste.)
Update 3/28/20: Many people have asked me to prepare a version of this article that can be printed out easily. You can buy an Easy Print Pack version of How To Dye Eggs Naturally here, for $1.99. Your purchase will help keep Mama Lisa’s World online.
General Instructions for Preparing the Dyes
Cover the ingredients with water, while making enough dye to cover the eggs you’ll want to color. Add white vinegar to help set the dye and bring out the color. You’ll want about 3-4 cups water to 1 T. white vinegar. Bring the water to a boil and then simmer it for about 30 minutes. If the color is still not released you can add more vinegar and let it simmer for another half hour – being careful not to let the water boil off. You can also try to gently smash the ingredients with the back of a wooden spoon.
When using green leafy vegetables, substitute 1 teaspoon of baking soda for the vinegar. That works better to help release the green color from the leaves.
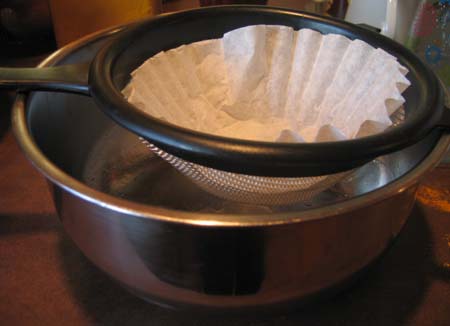
After cooking, strain the colored liquid through a strainer to separate the ingredients from the dye. If there are still little bits of ingredients in the dye you may need to strain it again through a coffee filter inside the strainer to separate them from the liquid. (Place coffee filter in the strainer as shown below.)
Coloring the Eggs
There are two ways to actually color the eggs:
-Cook the eggs in the pot with the ingredients that make the dye. Beware that with this method the eggs will have a less consistent color. It’s great, if you like the variegated look.
Also, be aware that some dyes are more likely to scrape off when the eggs are cooked this way. This is particularly the case with berries and juices.
For a more consistent color on the eggs, hard boil the eggs in advance and prepare the dye separately, as described for each color below.
After the dye is ready, pour it into a bowl, add the hard-boiled eggs and let them soak. They can soak for anywhere from five minutes to several hours. The longer you leave them, the darker the color. If you’re letting the eggs soak for a long time, turn them in the dye occasionally for a more consistent color on all sides of the eggs.
Drying the Eggs
When you are ready, remove the eggs from the dye and let them dry. Be careful where you dry them, because some eggs may take on the pattern of whatever surface you rest them on. This is particularly a problem with paper towels. (As I found out the hard way!)
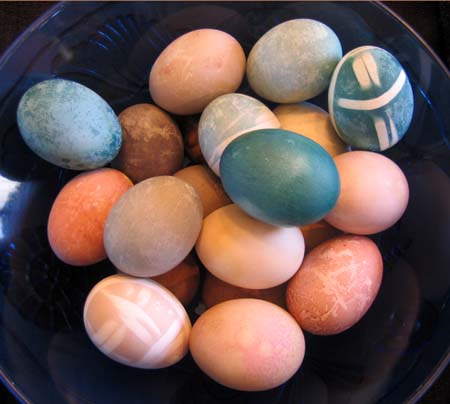
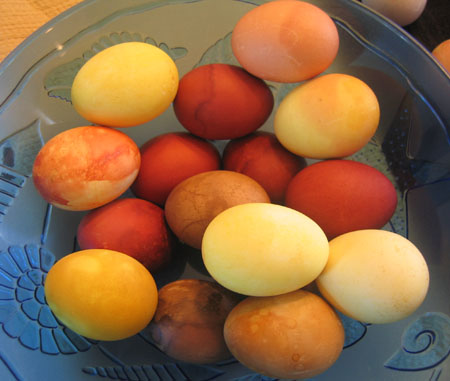
The Colors
I’ve listed the colors loosely following the order of a rainbow: red, pink, brown, orange, yellow, gold, green, blue, and purple.
Dyeing Eggs Naturally RED
Red Onion Peels Work Well
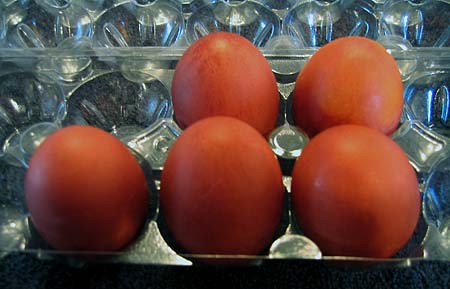
Red Onion Peels
Some people take the extra loose scraps of onion peels from the onion bin at the store to get extra peels.
Peels of 5 Red Onions
6 Cups of Water
1 T. Vinegar
Boil 30 Minutes
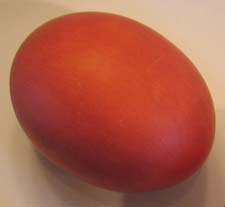
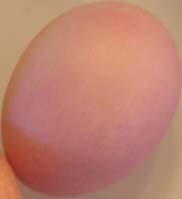
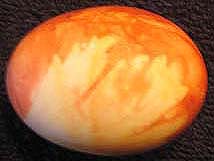
This worked very well! I got wonderful brick red eggs. If you boil the eggs with the skins they’ll look mottled. If you want them to look more uniform, cook the eggs first, separately and then let them soak in the dye. Short soaks in this dye will produce a salmon colored egg. (The egg in the photo below soaked for 5 minutes.)
Cultural Note About Red Eggs in Greece, Romania and Bulgaria
In Greece, the tradition is to dye the eggs red on Red Thursday – which commemorates the day the Last Supper was eaten. It’s also called Unholy Thursday because that’s when Jesus was betrayed by Judas. The red of the eggs represents the Blood of Christ. Red eggs are also important in Bulgaria and Romania.
Dyeing Eggs Naturally PINK
Beets Work Well, Strawberries are so-so,
Cranberry Apple Juice Didn’t Work Well
Beets
4 c. Beets chopped up with red part of stems
4 c. Water
1 T. Vinegar
Boil 5 minutes
Simmer for 25 minutes
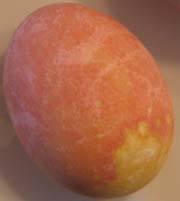
This worked well though my eggs are not uniform in color
Comments: Next time try using 2 T. vinegar – it may help with uniformity of color.
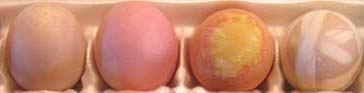
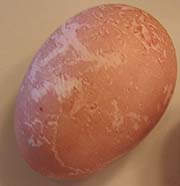
The egg below I cooked with the beets. You can see that the color is inconsistent throughout the egg. Though I find it to be pretty!…
The egg below I cooked separately and then soaked in the “beet dye” – it’s more uniform in color…
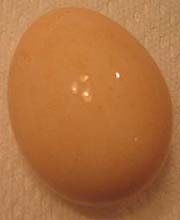
Strawberries
1 c. Strawberry Bits (parts we weren’t eating, not including the green stem)
2 c. Water
1 T. Vinegar
Boil 10 minutes
Simmer for 20 minutes
Cooked egg with strawberries. The dye from strawberries done this way is too soft as you can see in the photo below. It scrapes off too easily. The egg below was cooked with the strawberries…
Mediocre Results from the Following:
Red Apple Peels – mediocre color – not really recommended.
Cranberry Apple Juice – peels off easily – not recommended.
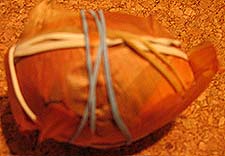
We did happen to get one pretty effect using rubber bands and cranberry apple juice. We wrapped the rubber bands around the eggs to create a design and then we dunked one of the eggs in the cranberry apple juice dye. Here you can see a photo of eggs with rubber bands wrapped around them…
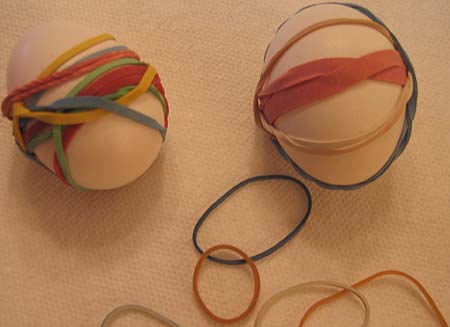
Here you can see the egg after it came out of the dye. We let it dry and then took off the rubber bands…
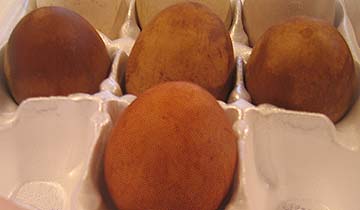
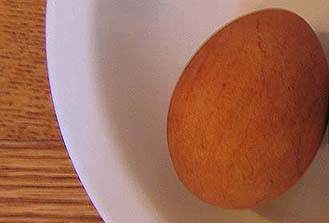
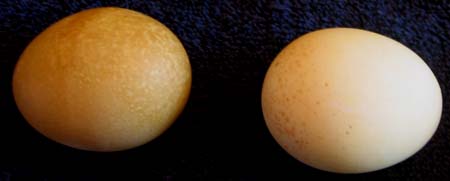
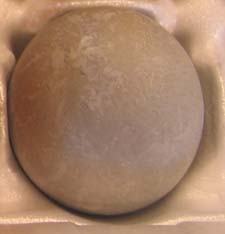
Dyeing Eggs Naturally BROWN
Coffee and Black Tea Work Well
(If you plan on eating the eggs eventually, be aware that the ones made with coffee had a funny taste.)
Coffee
2 1/2 – 3 cups Coffee
1 T. Vinegar
Boil for 5 minutes
Simmer for 20 minutes
Comments: Next time I’ll try coffee without cooking it for so long at it tends to burn after a while and smell badly! I doubt it needs to cook for too long, if at all.
You can see in the photo below, both eggs cooked with the coffee. That’s why they have variegated colors. The egg on the left continued to soak in the coffee for a few hours, that’s why the darkest part of that egg is so dark.
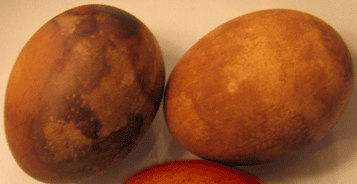
(Since this posting, I’ve read that you can dye eggs other colors and after they dry dip them into coffee “dye” to give them an aged look.)
Black Tea
5 Tea Bags
2 1/2 cups Water
1 T. Vinegar
Boil for 5 minutes
Simmer for 25 minutes
Great brown color! It looks like wood.
Dyeing Eggs Naturally ORANGE
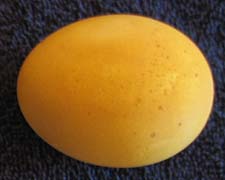
Yellow Onion Peels Work Well
Yellow Onion Peels
Many people take the loose scraps of onions peels from the onion bin at the store to get extra peels.
Peels of 4 Yellow Onions
6-8 Cups of Water
2 T. Vinegar
Boil 10 Minutes
Simmer 20 minutes
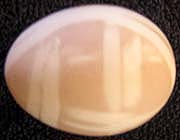
This worked very well! If you like an organic, mottled effect, try wrapping a couple of eggs in onion skins (held on by rubber bands) and cook them with the skins that way. The photos came out a little blurry, but I thought they were worth posting so you could see how to wrap the onion and also see what the effect looks like on the finished egg
I first put a celery leaf against the egg before I wrapped it in the onion peel. That’s why you can see the leaf pattern on the egg below…
If you simply cook the eggs in advance and let them soak in this dye for a while, they’ll end up looking like the “brown” eggs you buy in the store.
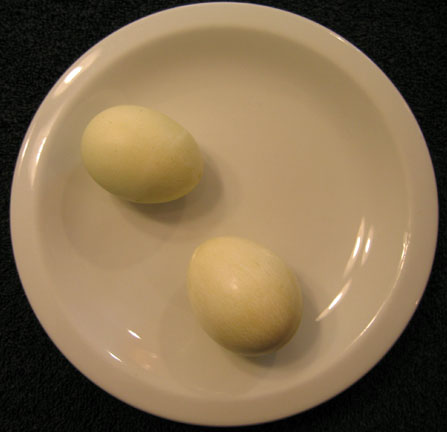
Dyeing Eggs Naturally YELLOW
Turmeric and Green Tea Work Well
Turmeric
5 cups Water
1/4 c. Turmeric
2 T. Vinegar
Boil for 5 minutes
Simmer for 30 minutes
After simmering, filter the turmeric dye mixture through a coffee filter inside a strainer to get rid of the excess turmeric.
Comments: This dye worked well, but next time I would make a smaller amount with less turmeric (as the turmeric was a little messy). I’ll try 3 cups water to about 2-3 T. Turmeric and 1 T. Vinegar.
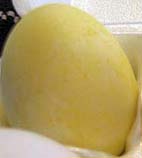
These eggs below were cooked with the turmeric mixture…

Green Tea
7 Tea Bags
3 cups Water
1 T. Vinegar
Boil for 5 minutes
Simmer for 25 minutes
We obtained this yellow-green color with a fairly short soak…
This egg below soaked overnight in the green tea…
Dyeing Eggs Naturally OCHRE and GOLD
Strawberry Stems worked well
Strawberry Stems
Stems of 1 pound of Strawberries
2 cups Water
2 T. Vinegar
Boil for 15 minutes
Simmer for 15 minutes
Interesting color!
Chamomile Tea
5 Tea Bags
2 1/2 cups Water
1 T. Vinegar
Boil for 5 minutes
Simmer for 25 minutes
Chamomile Tea produces an ochre color with long soaks, like the egg below on the left, and a nice pale color with short soaks, like the egg on the right…
Mediocre Results:
Yellow Apple Peels
Color scrapes off. Not great results.
Dyeing Eggs Naturally GREEN
Spinach Works Well (if you know the secret!)
I tried numerous tests with spinach that didn’t work. I used fresh spinach, frozen spinach and pre-cleaned spinach – all cooked with vinegar and water and simmered for half an hour. Nothing worked! Finally I read somewhere to use baking soda (which is also used in some batik dyeing processes). I also read not to use fresh spinach. Lastly, I read that if you’re not getting colored water after simmering for 1/2 hour, then let it simmer longer and mush up the vegetables. So I tried my last package of frozen spinach with all of these suggestions and it worked! Hurray! Green eggs at last!
The results are subtle in the photos below, the green is light, but you can see it better in person…
Spinach
10 oz. pkg. Frozen Spinach
1 t. Baking Soda
2 cups of Water
Boil for 5 minutes
Simmer for 60 minutes
Mush up spinach to release the color. Make sure water doesn’t simmer away!
Total Failures for Green
All of these were failures for green – perhaps the trick is in the baking soda – next time I’d try it instead of vinegar to draw out the green from the vegetables.
Kale
String Beans
Artichokes
Avocado Peels
Dried Bay Leaves
(I doubt the last two would work even with baking soda.)
Cultural Note About Green Eggs in Germany
In the past, eggs were given up for Lent in Europe. However, one book (“Victorian Easter” by Dave Cheadle, Premium Press America, 2006) reports that, during the Victorian Era, in Germany people were allowed to eat Green Eggs on Maundy Thursday, which is the Thursday right before Easter. It is also called Green Thursday. Maundy Thursday commemorates the Last Supper, eaten by Jesus and his disciples. It was a Passover Seder. During a Seder, bitter (green) herbs are eaten. It’s believed that the green eggs may have represented the green bitter herbs of the Seder eaten at the Last Supper. (Later the custom changed to eating green vegetables instead of green eggs on Maundy Thursday.)
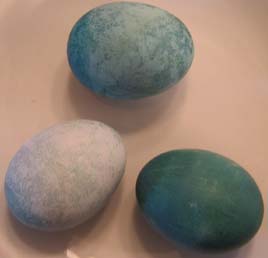
Dyeing Eggs Naturally BLUE
Red Cabbage Works Well
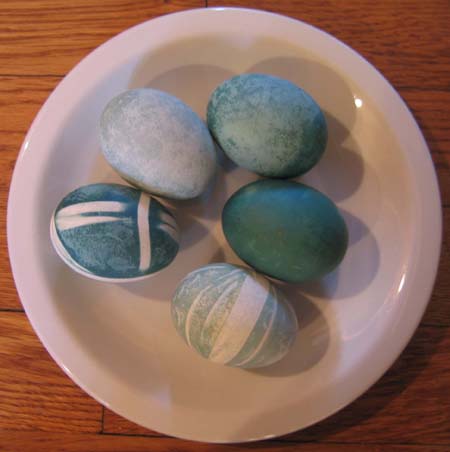
Red Cabbage
10 cups Water
1/2 Head of Red Cabbage
3 T. Vinegar
Boil for 30 minutes
Comments: This dye worked well! A long soak overnight makes it a more intense blue.
The eggs below with more variation in color were cooked with the cabbage. The darkest egg soaked for a long time…
Dyeing Eggs Naturally PURPLE
Blueberries and Grape Juice Work Well
Frozen Blueberries
2 cups Frozen Blueberries
3 cups of Water
1 T. Vinegar
Bring to boil
Simmer 30 minutes
I got a nice dark purple on the egg below by cooking it with the blueberries and then letting it soak for about 5 hours (for some reason the dye on the end of the egg turned brownish – I don’t mind this organic type of look.)…
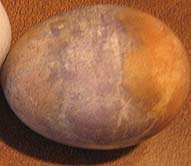
For light to medium purple, I soaked it for a short amount of time…
Grape Juice
2 cups Grape Juice
1 T. Vinegar
Boil for 15 minutes
Simmer 5 minutes
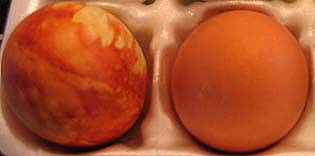
I cooked one egg with the juice. It got very dark, but a lot of the color scraped off. The soak I did later with a precooked egg worked much better. That’s the method I’d recommend for juice in general (cook the eggs first separately, then soak them in the juice). Beware: Juice scrapes off very easily. The color on the eggs that soaked in grape juice is grayish, like in the photo below…
Shiny Eggs
It’s easy to make your eggs look shiny. Gently wipe a small amount of vegetable oil all over the egg with a paper towel for a beautiful, shiny effect.
Conclusion
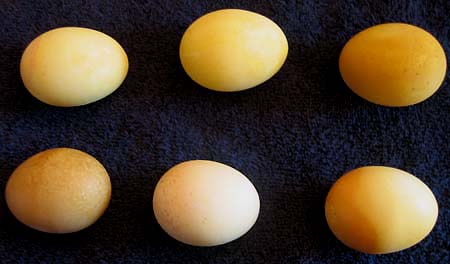
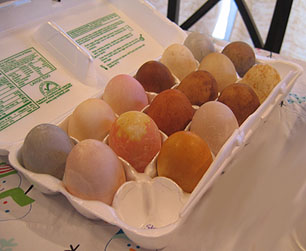
Here are some pictures of many of the eggs side by side.
That’s it! After a week of driving my husband crazy, sending him repeatedly to the supermarket to pick up this ingredient or that, and filling our refrigerator with container after container of dye… I’m done. My eggs-tremely eggs-citing, eggs-cellent eggs-periments are complete.
I hope you have as much fun trying them as I did.
P.S. I wouldn’t hide these eggs indoors for an Easter egg hunt, since the dye might stain your furniture.
P.S.S. I almost forgot – I also did some nice marble effects on eggs, which Ive written all about in a separate post.
This article was posted on Monday, March 3rd, 2008 at 5:30 pm and is filed under Countries & Cultures, Crafts, Dyeing Easter Eggs, Dyeing Eggs Naturally, Dyeing Eggs Naturally, Easter, Easter Eggs, Holidays Around the World, Mama Lisa, Parenting, United Kingdom, USA. You can follow any responses to this entry through the RSS 2.0 feed. You can skip to the end and leave a response. Pinging is currently not allowed.


March 4th, 2008 at 9:17 pm
That’s a lot of boiling and soaking! I do like that soft nature-hued look, and the mottling and the pretty celery leaf pattern. The eggs would make a pretty decoration nestled in a wooden bowl filled with raffia … for a while.
March 12th, 2008 at 8:41 am
What fabulous info! Thanks for sharing your adventures in egg dying. I look forward to trying some of your experiments! ;)
March 24th, 2008 at 6:17 am
You can try to use:
– dry onion leaves for yellow color;
– walnut leaves for green color.
You can make some design using parsley, dill or other small size leaves that can be tied to the egg in a piece of fine or very fine cloth tied at one end (you put the egg in the center of the cloth and bring all the ends above the egg and tie with a piece of string). The tie also leave a interesting star mark.
P.S. I will try some of your recipes for this easter.
August 14th, 2008 at 9:25 am
THANKS ALOT FOR YOUR INFORMATION MY EGGS IS ALMOST FINISH GRAB BY ALL THE KIDS AND THIER PARENT, THEY ALSO ASK FOR THE TIP TO MAKE THIS EGG I’LL SEND THEM A COPY FROM YOUR WEBSITE
April 2nd, 2009 at 11:41 pm
[…] Dye your own eggs! Experiences not just eating Or perhaps more valuably, spend easter with friends, partners or family and spending time with loved ones is the best gift of all. Camping and holidaying is a popular Australian easter past time. Chris and I are spending easter at Port Fairy by the sea and we can’t wait! […]
April 7th, 2009 at 10:22 am
nice
April 9th, 2009 at 9:23 pm
[…] the next few days, I’ll be posting easy directions to dye eggs with natural products, like fruits and vegetables, that you can follow at […]
April 9th, 2009 at 9:26 pm
[…] boil white eggs. 2) Prepare egg dyes. You can use store bought dyes (*see note below) or follow my instructions to prepare natural dyes. 3) You can dye some eggs different solid colors to have a base color for your marbling. You can […]
April 12th, 2009 at 11:19 am
I dyed eggs for a Greek Easter surprise! I used yellow skin Spanish onion skins from 4 larger onions, 2 tblsp. of white vinegar and 4 cups of water. The liquid boiled for about 1 hour on medium/low heat before I put the eggs in. Then, after cooking and cooling, I polished them with olive oil. Beautiful and a deep maroon/red color. This was so interesting that I came upon your website with great ideas about other natural colorings. Thanks, what a great website. I am going to save the dye and try to paint a picture as well.
April 16th, 2009 at 9:14 pm
Help! I’m coloring eggs in a dye I made from yellow onion skins, but the eggs are not yet the deep red I need them to be. (I’ll be bringing them to church for Orthodox Easter this Sunday.) How long should the dyeing process take? It’s been an hour already! Is it too late to make the dye from red onion skins and transfer the eggs to the new dye?
April 17th, 2009 at 12:09 am
I think you can try it – I think it might work. I just wouldn’t cook the eggs any more. So make the dye as per the instructions for red eggs above (using red onion skins) and then soak them. You can take an egg out from time to time to see if it’s red enough.
Good luck and let us know how it works! Hopefully you won’t have to use new eggs (I don’t think you’ll have to).
Best wishes,
Mama Lisa
April 22nd, 2011 at 5:32 am
[…] Mama Lisa’s World Blog […]
July 5th, 2011 at 9:48 pm
I found this on using spinach for green dye:
SPINACH FOR COLORING GREEN.
Take three handfuls of spinach, and pound it in a mortar to extract the juice. Then put it into a sauce-pan and set it over a slow fire. When it is just ready to boil, take it off and strain it. By stirring in a small quantity of spinach-juice, you may give any sauce a green color.
March 19th, 2012 at 8:30 pm
[…] Family Fun shows you how to use leaves to create these interestingly patterned easter eggs, and Mama Lisa shares ideas for dying eggs naturally with fruit and vegetable skins – Kidspot has you […]
March 24th, 2013 at 10:51 am
beautiful hard boiled eggs fo beautiful hard boiled eggs for Easter. First we take a bunch of yellow onion skins and boil them until the color goes into the water. While the water was boiling we would gather grass, dandelion leaves, clovers and violet flowers securing each egg with a metal twisty tie. Then we would boil eggs the same time is hard boiled eggs. then slip away the nylon stockings and brush away the cooked leaves. Presto beautiful eggs light brown in color with the green leaf or the purple flowers of the violet . They are always a great big huge hit in the kids love to make them.
March 24th, 2013 at 10:56 am
That’s cool Debbie! If you’d like to share any photos, I’d be happy to post them on my blog. Happy Easter! Mama Lisa